
Tutorial coloring sky with copics
Kit and clowder

Debbie
UPDATED Tutorial for Merging Digital Images
.Gunn's gaveeske til lys og sertivetter
Using paint.NET

In word you have two ways of bringing your image in. Firstly by copying and pasting. Go to where your digital image is saved on your computer and right click. Choose Copy.

Open up a new page in word, right click and choose Paste, or a quick way to do this is to press the control key and "V".

Now your image is on the page you will want to be able to move it around. Right click on your mouse, Choose Text Wrapping and then Square.

OK, now you are free to move your image around the page but you may need to resize. You will see the square around the image. Right click on the top left hand corner of the box and Wthen hold down the left click button on your mouse and move it up or down to resize.

When you think you have it in the right postion print out on paper, not your stamping card. I then put my image against it to see if I have the right height. Adjust as necessary for your image. Once I have it in the right place I need to mark where I will need to stamp my image.
Now you need to get out your stamping card. You may want to test different cards with the inks in your printer. For printing digi's with my HP printer I have to use the cheapest black ink I can find. It is all down to the pigment in the ink. If I use the original ink, then it smudges with my copics. I also set to print on draft but again your printer may be different, so please experiment and don't give up.
Place your draft copy with the mark in position on top of your stamping card. I use a very sharp pencil to go through the marker and pierce the paper and inserting the dot onto the stamping card. This is where I will need to stamp my image.

Stamp your image where you have marked.

Now yo need to mask off your image. You will need a masking tape, I have used woodware, staz on ink, this is important and the only ink you can use on shiny surfaces and of course your choice of image. Stamp out your image using the staz on onto the masing tape/film and cut out.

Match the mask over your stamped image on your cardstock and you are now ready to put the image through the printer to add your digi background.
 Remove your mask and you are now ready to colour. Be careful when removing your mask as the printer ink on top of the mask will come off on your hands and you do not want to get this over your image.
And here is my finished card.


Mal til sjokolade kort-stort
har kun moderert den til å passe en stor sjokoladeplate, istedet for en mellomstor. Og det kun ved å endre Kartongmålene til 29*23cm istedet for 19cm * 23cm.
Dette blir da utgangspunktet ved å følge brettemålene til Marianne
.Kartong: 13cm * 29cm
Preg ved: 8cm – 9cm – 17cm – 18cm
Lag to klaffe: 3,5cm * 3cm
Preg klaffene 1 cm inn fra hver side, så du har tre felt på 1cm hver.
 Nå kan du punche en mønsterkant om du ønsker det, og dekorere med mønsterark der du måtte ønske det. Min ser slik ut før montering. Arkene jeg har brukt er fra Pion Design, og bord punchen fra Martha Stewart;
 Så monterer jeg den sammen som veldig godt forklart i Marianne sin blogg. Og pynter etter hjertets lyst.

.GUNN'S GAVEESKE TIL LYS OG SERTIVETTER


Lage "egne" tags med Silhouette Cameo

Tutorial: walletcard

Tutorial Coloring Sky with Copic's

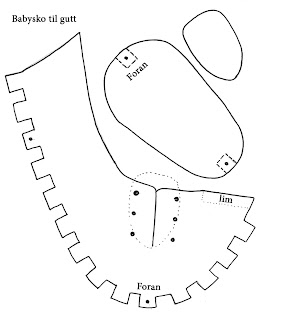
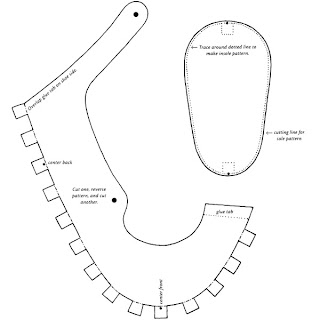
Mal til Babysko/gutt
Mal til Babysko/jente
Tracy's tutorial, how to mergin digital with rubber, in WORD

Tutorial, coloring skin tones with Prisma colors on Kraft

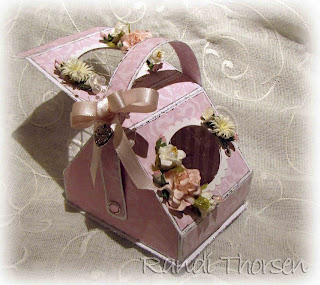
Randis kurv
Tutorial, Coloring with Prisma on Kraft with Judy.

Tutorial - How to change the line colour of a digital image
How to use your Make it Crafty Digital Stamps in MS Word

Tutorial on How To Use Digi Stamps and Water Colour...(by Kellie)

Jen's wonderful Prismacolor Guide

Coloring on cardstock with Prisma colors, by Jen.

Changing Color of Black Digital Stamps Tutorial--Digital Ink


Lena Katrine's Telys kort


Card and shadow card Tutorial

Double punched corner
If you use anayone of this tutorials, please link back to the person who made it!!
STAMPARTIC'S TUTORIALS